How to Cut Heat Transfer Vinyl
As per Technavio, the global custom apparel market is expected to grow at a CAGR of 7.22% between 2022 and 2027. This increasing trend is attributed to internet penetration and the use of custom t-shirts as a branding tool.
Heat Transfer Vinyl (HTV), also known as iron-on vinyl, is a popular method to achieve custom designs on clothing and other décor items. And the simplest as well – because it only requires cutting the vinyl with a dedicated vinyl cutter.
This blog explains the critical process of cutting heat transfer vinyl to copy designs onto different materials.
In This Article
- Tools Needed to Cut Heat Transfer Vinyl
- Cutting Heat Transfer Vinyl: A Step-by-Step Guide
- FAQs of Cutting Heat Transfer Vinyl
- Conclusion
Tools Needed to Cut Heat Transfer Vinyl
Before you begin your HTV project, make sure to collect all these materials and tools:
Heat Transfer Vinyl
One of the reasons why heat transfer vinyl is so popular for customization is the variety of choices it offers. You can find different colors, textures, and types of vinyl on the market. Some popular HTVs, available on the xTool materials store, are:
1. Solid Color Vinyl

This is the most common type of HTV. It’s perfect for creating bold, single-color designs. You may use it to add logos, names, or simple graphics onto t-shirts, hats, etc.
2. Patterned Vinyl

Patterned vinyl adds a touch of flair with its diverse range of designs and prints. It’s fantastic for making statement pieces or unique custom items. Use it on bags, shoes, and home décor items to make your designs stand out.
3. Glitter Vinyl

For those who want to add a bit of sparkle, glitter vinyl is the way to go. It’s great for festive occasions, dance costumes, or items where you need extra shine.
4. Glow-in-the-dark Vinyl

This vinyl charges in light and glows in the dark, making it ideal for night-time visibility or decorative items. It is great for party decorations, safety signs, and personalized glow-in-the-dark gifts.
5. Puff Viny 3D

When pressed and heated, the vinyl expands to create a unique raised “puff” finish. This adds dimension and personality to the HTV craft project. You can use it for customizing shirts, pillows, sportswear, aprons, and festive decorations.
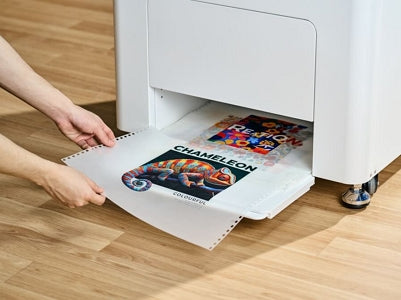
6. Chameleonic Vinyl

Chameleonic vinyl changes color when viewed from different angles or under different lighting conditions. This vinyl can add a unique, colorful twist to t-shirts, bags, and other apparel.
7. Color Changing Vinyl

Color-changing vinyl, known as UV reactive vinyl, changes color under sunlight or UV light. For example, white vinyl might turn blue, pink, or purple when exposed to sunlight. You can use it for making customized t-shirts, caps, and even interactive window decals.
Vinyl Cutting Machine
The main tool that ultimately decides the quality of HTV printing is the vinyl cutter. You cannot achieve design precision with ordinary scissors. You have to use a specialized vinyl-cutting machine.
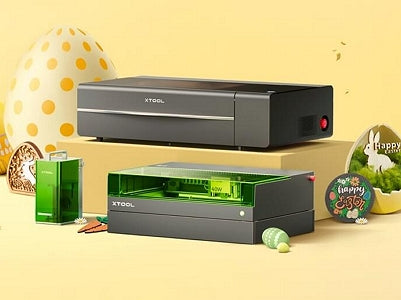
xTool M1 Ultra: The Best All-Round Solution for Vinyl Cutting

M1 Ultra is currently the best crafter machine on the market. Vinyl cutting is one of its key specialties. There’s a dedicated fine-point blade to cut small thicknesses like vinyl. Besides that, it has tapered and rotary blades for cutting thick materials and fabrics, respectively.
To cut vinyl with M1 Ultra, you just have to drag and drop the design. The machine does the rest. Even cutting parameters for various types of vinyl are pre-saved in our software.
M1 Ultra is the world’s first machine to offer 4 different modules in one compact machine. It can function as a laser cutter and engraver, a blade/vinyl cutter, a color printer, and a drawing machine.

So, with M1 Ultra, you’re not getting a vinyl cutter, but three other machines. This expands your creative toolbox and opens doors to multiple crafting ventures.
Cutting Mat

You need a mat to place underneath the vinyl so the blade doesn’t damage the surface beneath while cutting the vinyl.
Weeding Tool

A tool to remove the excess vinyl around your design after cutting. Use it carefully to peel off areas other than the design.
Iron or Heat Press

For bulk production and small business, using a heat press is recommended as it applies the HTV uniformly over the materials. However, for small designs and DIY projects, the everyday iron is sufficient for the job.
Cutting Heat Transfer Vinyl: A Step-by-Step Guide
Cutting heat transfer is not a difficult job. You just have to follow the right steps to succeed:
Step 1: Design preparation
First, prepare a design for the cut-out in any graphic design software. It has to be a vector file.
Import that design into XCS. The software is user-friendly with all simple options explicitly explained – no complex settings.

Since you’ll be cutting on the matte (back) side of the HTV, mirror the design. So, that it appears correctly when heat-pressed onto the fabric.

Step 2: Setting Up the Cutting Machine
Place the vinyl inside the vinyl cutting machine (M1 Ultra/M1) with a cutting mat underneath. Place the shiny side down, as this is the carrier side and needs to remain intact for heat application. The dull, adhesive side is what gets cut.

You also have to feed the cutting parameters to the machine. Fortunately, with XCS you don’t have to try and test setting. We have already done that for you. Select the ‘Blade cut’ and select ‘More’ under the ‘Material’ tab. It takes you to the Materials EasySet Library in XCS. Import the required cutting parameters.

Users with earlier versions of XCS can visit the material library online and manually enter the parameters.
Step 3: Cutting the HTV
Once the parameters are set, click the ‘cut’ option. The blade will automatically move across the HTV, cutting it precisely.
Step 4: Weeding the Design
Use a weeding tool to remove the excess vinyl around your design. This requires precision to avoid damaging the design.

Step 5: Applying the Heat Transfer Vinyl
Preheat your iron or heat press and the fabric. Position the HTV design on the fabric with the carrier sheet facing up. Apply heat and pressure according to the HTV and fabric instructions. Let it cool briefly, then peel off the carrier sheet.
RELATED: heat transfer vinyl heat press temperature and time guide

FAQs of Cutting Heat Transfer Vinyl
When Cutting Vinyl Which Side Goes Down?
Place the glossy side down and the matte side up. The carrier side goes down on the cutting mat as it needs to stay intact for heat application. The duller (or adhesive) side is the part that gets the cut.
What Cut Setting for Heat Transfer Vinyl?
The cut settings depend on the type of vinyl and the machine you’re using. For the xTool M1, if you're cutting solid vinyl, we recommend setting the cut pressure to 100 and the speed to 70mm/s. For specific settings for your vinyl, refer to our materials library.
Conclusion
It is fun making something of your own. With HTV and its simple approach, you have the chance to showcase your creativity and start creating personalized items. All you need is some vinyl and a cutting machine like M1 Ultra.
The M1 Ultra can do a lot more than just vinyl cutting, making it a great tool for any crafter. So, why not give it a try and unlock your crafting potential? Who knows what amazing things you’ll create!
For more questions. Please join our Facebook group to get inspired!