
How to Engrave Glass with a Diode Laser?
Engraving glass with a diode laser directly, as with a CO2 laser, is not possible. The wavelength of the blue diode laser engravers is 450-455nm, which passes through the glass. Since it is not absorbed by the material, the etching or engraving does not occur.
However, you can still engrave glass using a diode laser.
In this article, we will teach you how to engrave glass with a diode laser engraver. You can follow the same method on any type of glass or just a plain glass sheet.
In This Article
- Items Needed to Engrave Glass with a Diode Laser
- Steps to Engrave Glass Using a Diode Laser (xTool S1)
Items Needed to Engrave Glass with a Diode Laser
We need a diode laser engraver, and in our case, we are using xTool S1. Other than that, we need a few other things.
1. Laser Marking Paper/Spray
When this paper is applied to the glass, it helps absorb the laser beam of diode lasers. The paper can easily be removed from the surface after engraving.

You can also use laser marking spray, paint or other coating.

2. Denatured Alcohol
Before applying the paper, the glass should be clean.
The glass might appear clean, but there could be fingerprints or small dust particles that can affect the engraving. Therefore, it is better to apply denatured alcohol to the surface and clean it.
3. A Few Drinking Glasses
Buy a few drinking glasses because you might end up wasting a few of them at the start.
A few trials are needed before getting the perfect result. You can buy cheap glasses for the trial, and once you understand the settings and nitty-gritty, you can opt for the standard glass.
4. Rotary Attachment
Drinking glasses are cylindrical, and for cylinder engraving, you need a rotary attachment.
A regular cylindrical drinking glass is easy to engrave as it can be used on any type of rotary attachment. But for wine glasses and drinking glasses with handles, you need special rotary attachments.
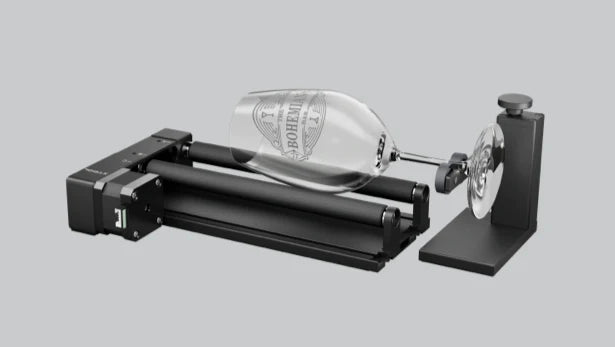
xTool has solved this issue by introducing the world’s first 4-in-1 rotary attachment, RA2 Pro, that is suitable for 90% daily cylindrical engraving scenarios. Whether the glass is regular or irregular, the attachment is suitable for all.
Steps to Engrave Glass Using a Diode Laser (xTool S1)
Step 1: Prepare the Glass
First, measure the perimeter of the glass, which will be needed later in the engraving setup.
Next, apply alcohol on a piece of cloth and clean the glasses.
Then apply a layer of acrylic paint to the glass surface where your design will be engraved. Make sure the paint is as even as possible and is slightly larger than your intended design area. Let it dry completely before engraving.

Source: LiciaToday - Youtube
Step 2: Connect the Rotory Attachment
Connect the rotary attachment to the laser engraver and secure the glass with the attachment. Make sure the attachment is level with the machine.

Then move the laser module over the coated area.

Step 3: Import Your Design
Create your design in xTool Creative Space, or your preferred design software. Once your design is imported in XCS, resize it to fit the intended engraving area. The position of the laser module is shown as a red corss on the software screen. Drag your design next to the red cross. This positions your design where it needs to be engraved on the physical glass.

Step 4: Adjust the Engraving Settings
Set the power to 100% and speed to 75 mm/s. We are using the 20W S1. If you are using the 10W or 20W module, then adjust the settings accordingly. Next, enter the dimension of your glass.

Step 5: Adjust the Laser Focus
Click the icon next to the Distance(mm) field, then the distance(focal length) will be automatically adjusted.

Step 6: Preview the Engraving Path and Start Engraving
Click the "Framing" button to preview the engraving path and see if the laser module is "engraving" within the coating area. If the previewed engraving path is outside the coating area, adjust the size of the design or the position of the glass.
Once everything is fine, start the engraving process.
Step 7: Post Cleaning
Hold the engraved glass under flowing water and rub off the coating. Your engraved glass is finished!

Related Reading: How to use laser marking paper?
For more questions, please join our community to get inspired!

