How to Make Stained Glass with Acrylic

About the Author:
Hi I'm Leone Elk Bratcher! I began my laser journey for a wedding that needed decor and gifts. My passion for the craft was immediate and my one laser quickly turned into 4! Now I have a team of talented people behind the craft and we’re growing our little business (LB Art) one day at a time.
Creating stained glass art is a captivating way to add color and beauty to any space, but the traditional method can be daunting and expensive. Fortunately, there's an accessible and versatile alternative: using acrylics. Crafting stained glass with acrylic offers a modern twist on an age-old art form, making it possible for anyone to achieve stunning, vibrant designs without much cost or the need for specialized tools or materials.
In This Article
- Why Acrylic-made Stained Glass Is Better
- Before Getting Started
- Make Stained Glass with Acrylic and Laser Cutter
- More Stained Glass Making Tutorial with Acrylic
Why Acrylic-made Stained Glass Is Better
This is a beautiful stained glass piece that is approximately 12” x 12” (304.8 mm). The production cost on this piece was around $450, and was very labor intensive. While the piece is very nice to look at, the production costs price it out of the market for a large percentage of the population, making sales more difficult. In addition, the piece is very heavy, making it much more difficult to hang. Due to the glass structure, the piece is also fragile.

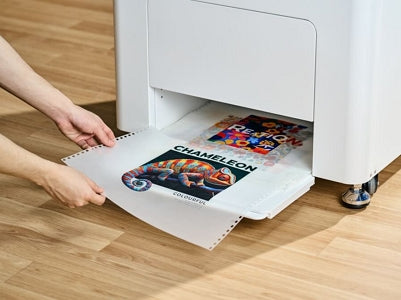
There is an affordable and time efficient way to make a beautiful sun catcher using acrylic and a laser machine. In this case, because we are using translucent acrylic, I’m using my CO2 laser machine xTool P2. I used 3 mm baltic birch for framing and 3 mm acrylic in various colors for the inset portion of the piece. I also used Loctite super glue. There are numerous glue choices and the maker should decide which works best for them.

So in short, making stained glass with acrylic is cost effective (in this case approximately $25 in materials), extremely light weight, and time efficient, especially with the help of a laser cutter that cuts acrylic.
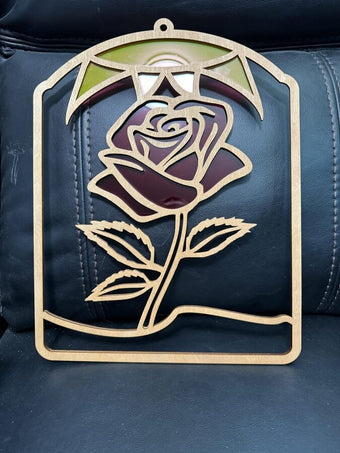
I will show you how to make this beautiful acylic sun catcher with laser cutter.
Before Getting Started
Have your materials at hand. I use 3mm basswood or Baltic birch, and 3mm cast acrylic in whatever colors I feel will compliment my design.
You will also need an adhesive. I use Loctite crazy glue or Gorilla Glue crazy glue. Others may use 3m tape. You’ll also want to have a clean, flat surface for assembly.
And most importantly, you need a laser cutter that cuts translucent acrylic.

Make Stained Glass with Acrylic and Laser Cutter
Step 1: Edit the Design
I start with design concept. I love roses, so that’s what I decided on. For simplicity, I often start with a clipart of what I want to start with.

Next we want to edit the image and remove the background. Then we’ll adjust the image by increasing sharpness and lowering grayscale. Due this until you get as close as you can to a black and white image. This will give you the best trace. Then trace your image. You’ll need to grab the image and pull the trace away from the original. Once you have a clean trace, you can delete the original clipart.


Since I was unable to ungroup the trace into separate elements, I exported it as an svg and opened it in a different software for editing. There are many to choose from but, since I’m familiar with Lightburn, that’s what I used.

First step is create a copy of the image. You’ll need this later to cut the acrylic inlay. Once you have your copy, begin building your shape. I chose an arch shape as show.

Once your frame is done you can begin adding other elements. I chose to add a “grassscape” below the rose, and sun beams above. As you add each element, you’ll want to use “combine” to weld them to the frame. Once you’ve gotten the design to where you are happy, make sure to add something to hang from.


Next you want to temporarily ungroup your piece and select and copy the inner elements that you created. Once I have all of my inner pieces copied, I like to put them each on the colored layer that corresponds to the color that I will be cutting the piece out of. I also prefer to add my kerf measurement so that the pieces fit snuggly into the frame. I won’t go into a kerf discussion here but it’s an option should you decide that you want to go that route.


The last thing that I do before I export as an svg is create a copy of the frame. This will lay over the entire piece and create depth. I prefer the frame to be slightly thicker than the lower layer but that is personal preference. I also framed both the front and the back in case I want to hang outside but only the front is needed if you’re haning on a window.
Step 2: Cut the Design
Now you’ll import into XCS, which is xTool's official software used with its laser machines. IMPORTANT!!! Depending on the size of your file, you may get a warning that your piece exceeds the bed size. Do NOT size to fit the bed – import at it’s original size. Then ungroup the pieces.
Choose the original frame and set all other elements to no output. Set the cut parameters of your frame (I have my own settings but you can use 3mm basswood preset if that’s your medium and those settings work for you.) I prefer to pre-stain my wood first, then align your design to the wood and begin your cut.

Now that you have your frame, begin cutting and placing your acrylic in the frame. First, set the frame that you already cut to no output. Choose the acrylic color that you want to start with and set it to output. Set you cut power and speed, and material thickness. Before placing on the bed, I like to remove the top protective sheet but leave the bottom during cutting. This protects the underside from being marked by the slats or honeycomb.
Remove the cut acrylic from the laser bed and peel the protective sheet from the backside. Leave the pieces face up for easy placement.
It’s so fun to watch the transformation when it comes together!


Step 3: Alignment
Once you have placed all of your acrylic pieces, carefully align your upper frame to the bottom layer and glue together. Be careful to make sure that your edges line up and your hanging circle is flush as well. Go slowly because alignment can be a bit tricky.
Now you’re ready to hang your beautiful piece, or sell for a nice profit!

More Stained Glass Making Tutorial with Acrylic
@mpgautheron This is how I made a stained glass for a big sculpture 🤭🥰☀️
♬ son original - MP GAUTHERON
For more questions. Please join our Facebook group to get inspired!