
How to Print on T-shirts?
Got a plain t-shirt and thinking about jazzing it up with your own style? Maybe you want to splash a memorable photo across the front or showcase a cool brand image.
Well, you’ve multiple ways to print pictures on shirts. Whether you want a DIY method to personalize your fabric or explore options to launch a t-shirt business, this guide will explore the various methods for printing t-shirts at home and walk you through the steps needed.
In This Article
- Printing on Shirts with Heat Transfer Vinyl
- Printing on T-Shirts with Screen Printing
- Printing on T-Shirts with Sublimation
- Printing on T-Shirts with DTF
- Printing on T-Shirts with DTG
- Which T-Shirt Printing Method to Choose?
Printing on T-Shirts with Heat Transfer Vinyl
In heat transfer vinyl printing, the design is cut on colored or patterned vinyl with a specialized cutter. Then heat and pressure are applied to stick it on top of the fabric surface. It’s great for single-color and simple textual designs and small custom orders – the best option for DIYers and beginners.

Tools and Materials Needed
- Blank T-shirts
- Heat transfer vinyl sheets
- A cutting machine (like xTool M1 Ultra)
- Cutting mat
- Weeding tool
- A heat press or iron
How to Print T-Shirts with Heat Transfer Vinyl?
Step 1: Create your design
Either use graphic design software to create your own design or get a ready-made design online. Download in a suitable file format, typically SVG. Ensure your design is properly sized according to the print area.
Step 2: Place the vinyl sheet

Place the vinyl sheet in the cutting machine with the shiny/glossy side facing down on the cutting mat, as this side will be facing up on the shirt when heat pressed.
Step 3: Cut the design
Import the design into the machine's software. Since the shiny/glossy side is put facing the cutting mat, the design should be mirrored before cutting to guarantee the image/text will show up correctly on the shirt after heat pressing.
Then set the cutting settings and initiate the machine. The machine will automate the rest process and precisely cut the design onto the vinyl.

Step 4: Weed out the excess vinyl

After cutting your design, carefully remove the excess vinyl that is not part of your design using a weeding tool. This leaves only your design on the clear carrier sheet, ready to be applied to the t-shirt.
Step 5: Heat press the vinyl design on your shirt

Position the vinyl design on the shirt with the shiny side facing up. Preheat your heat press or iron to the temperature recommended by the heat transfer vinyl manufacturer. Then apply firm pressure on the vinyl, which activates its adhesive layer, bonding the design onto the shirt.

Step 6: Peel off the carrier sheet

Peel off the clear plasitc sheet while it's still warm or cold according to the vinyl type to reveal the design.
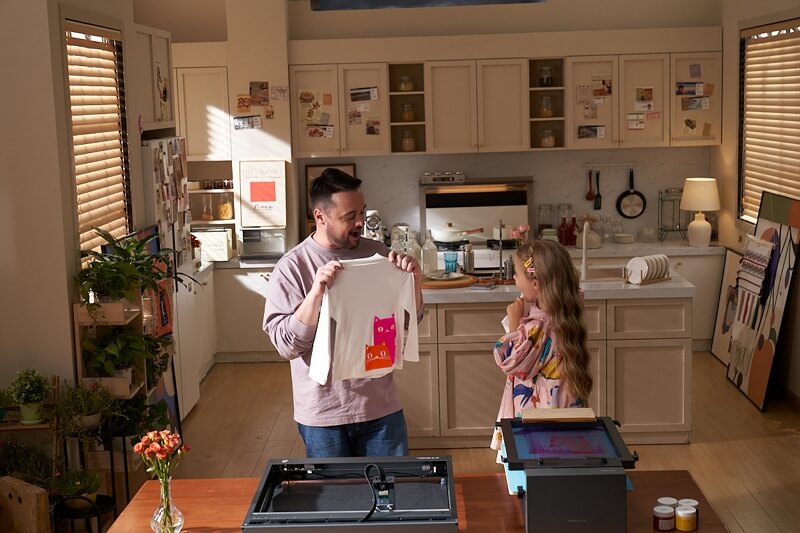
Printing on T-Shirts with Screen Printing
Screen printing is the most popular t-shirt printing method. In this process, first, a stencil screen of the design is prepared, and then ink is applied on the shirt with that stencil. Each color is applied using a different stencil, one at a time, combined to achieve the final look.

Screen printing is best for high-quality print jobs, large orders, and designs that require vibrant, solid colors. It’s a go-to method for event t-shirts, company apparel, and merchandise.
Traditional screen printing is known to be a time-consuming process. So here we'll introduce the modern and efficient screen printing, one performed with xTool screen printer and a laser engraver.
Tools and Materials Needed
- Blank T-shirts
- xTool Screen Printer
- A laser engraver
- Screen printing inks
- Pre-coated screens (included in the xTool screen printer package)
- A squeegee
- A spatula

How to Put a Picture on a Shirt with Screen Printing?
Here’s a short method to put designs on shirts with an xTool screen printer:
Step 1: Get the Digital Design of the Photo

You will need a digital file of the photo to be imprinted. You may transform your existing photo or create a new one on any graphic design software. If the photo is multi-colored, you will have to split the photo into layers, one color per layer.
Step 2: Engrave the Pre-Coated Screens

Now, based on the design and color, you need to engrave the pre-coated screens. Stretch the coated screens using the frame and place them inside a laser engraver. You can use an xTool S1 for engraving.
Connect the laptop to the laser engraver and import the design into the laser engraver software. Adjust the positioning of the screen and start the engraving.
Step 3: Setup the xTool Screen Printer

Set up and assemble the screen printer as per the user manual. Place the shirt on its bed and stretch. Then, place an engraved stencil over it. Adjust the height with the knob. Make sure the screen is very close to the shirt.
Step 4: Apply the Ink

Apply ink on the screen using a spatula, and spread it evenly with a squeegee. Change stencils based on the number of colors in the design. Wait for the ink to dry.
Your design is ready!

Printing on T-Shirts with Sublimation
Sublimation printing uses heat-sensitive inks that get infused inside the material when heated. These inks combine well with a synthetic medium (polyester, nylon). In this case, first, the design is printed on transfer paper with a sublime printer. It is heat-pressed on the top of the fabric; the pressure and heat infuse the design into the material.
Sublimation produces vibrant, high-definition images. Since the design is not on the surface but part of the fabric, it doesn’t crack or fade. The technique is best for full-color and realistic image printing.
Tools and Materials Needed
- Blank T-shirts (polyester)
- Sublimation printer
- Sublimation inks
- Heat transfer paper
- A heat press
How to Put a Design on a Shirt with Sublimation Printing?
Step 1: Create the Design
Create your design using graphic design software or get an existing one online. Make sure that the resolution of the pattern is high enough to get the best result.
Step 2: Print the image on the sublimation paper

In this step, it's crucial to have the image mirrored( horizontally flipped) before printing on the transfer paper. This ensures the design shows up correctly on the t-shirt when transferred.
Adjust the printer to hight-quality settings and print with the white side of sublimation paper facing up.

Step 3: Prepare the shirt
Get a t-shirt made out of polyester or containing at least 60% polyester content as sublimation doesn't work for cotton fabric. Use a heat press or iron to preheat it to remove any wrinkles or humidity.
Step 4: Transfer the image to the shirt

Place with the printed side of the transfer paper facing down on the t-shirt. Put a sheet of butcher paper over it to protect the material. Then set the temperature and time of the heat press according to instructions. Finally, firmly press the heat press to transfer the design.
Step 5: Remove the transfer paper
After heat pressing, the inks are vaporized and get infused into the t-shirt. The leftover transfer paper is easily removed. Now, your image is imprinted on the t-shirt.

Printing on T-Shirts with DTF
Like the vinyl heat transfer and sublimation heat transfer explained eariler, DTF (Direct-to-film) is a type of heat transfer printing. The design is first printed on a PET film and then transferred to the garment using a heat press.
It's compatible with most fabric types and excels at replicating full-color and detailed photorealistic graphics.
Tools and Materials Needed
- Blank T-shirts (polyester)
- DTF printer
- DTF inks
- PET film
- DTF powder
- DTF oven
- A heat press
How to Print T-shirts with DTF?
Step 1: Design preparation
Creat or obtain a high-resolution digital image in a format such as PNG, JPG, or AI. You may need to resize it based on how big you want it.
Step 2: Print the pattern on the PET film

Figure out which side is for printing and load the film into the printer.
Step 3: Sprinkle and shake powder on the printed film

Right after the printing, sprink adhesive powder all over the design and shake to spread it evenly.
Step 4: Bake the powder

Put the powdered film into a oven. The heat melts the powder to creat an adhesive layer to stick the ink tight to the fabric later.
Step 5: Apply the design to the t-shirt with a heat press

Once dried, place the DTF film on top of the t-shirt, ink-side down. Set the heat press to the right temperature and apply firm pressure for the recommended time.
Step 6: Peel off the film

Gentlely peel off the film while it's warm or cold to avoid ripping the design.
Printing on T-Shirts with DTG
DTG works much like a paper printer in an office. The t-shirt is placed in the printer, and the design is printed directly onto the shirt. This method uses a special textile water-based ink.
The method is capable of printing intricate, high-resolution images and designs. It allows for a lot of detail and unlimited colors without any additional setup. It’s perfect for small orders and print-on-demand services.
Which T-Shirt Printing Method to Choose?
All these methods, we discussed, are great for printing on fabrics, particularly T-shirts. However, if you want to choose one method, it needs to be done after considering the various strengths and limitations of each method.
Here are the key factors to weigh in before using the method:
Quality of Print
You need to enlist your requirements. Do you need to print simple designs or ones with intricate details? Also, consider the durability i.e. how long should the print last.
Screen printing is a durable option for printing vibrant-color designs. While DTG, DTF and sublimations are great for intricate designs and high-resolution prints. But durability may be comprised in DTG.
Order Quantity
Determine the number of t-shirts you need. Screen printing is more cost-effective for large orders due to its setup process, while heat transfer vinyl and DTG printing are better suited for smaller, more personalized orders.
Fabric Type
The fabric type matters as some methods work only on certain materials. For instance, the sublimation inks work best on polyester. Whereas, for both natural and synthetic materials, screen printing, DTF and DTG printing are the ideal choices.
Color Requirements
Evaluate the need for color accuracy and the range of colors in your design. DTG, DTF printing and sublimation allow for colorful or photographic prints. Screen printing is optimal for designs with fewer colors. However, if you need designs with special effects, only screen printing supports such FX inks.
Cost Considerations
Consider your budget and how the cost per item aligns with different printing methods. Screen printing becomes cost-effective for bulk orders. The modern screen printing method (xTool Screen printer) is also cheaper compared to other ones in terms of setup cost. DTG, DTF and sublimation printers are somewhat expensive.
Turnaround Time
How quickly do you need the T-shirts? Heat transfer and DTG can offer quicker turnaround times, particularly for small orders. Screen printing might take longer, especially when you have multi-color designs.
For more questions, please join our community to get inspired!

